
- Platform
- NetSuite
- Versions
- 2024.2+
- Extension
- SuiteApp.com
- Last Updated
- June 2025
This guide will walk you through the steps on integrating TaxJar with your NetSuite account. You’ll learn how to configure NetSuite for calculations, invoices, cash sales, credit memos, reporting, filing and more.
Sales tax is complex, with regulations changing constantly. For a primer on the basics of sales tax, including sales tax nexus, registration, filing, and more, please visit the TaxJar blog.
The Netsuite integration is for existing users only. If you are an existing user of the Netsuite integration and have a question, please reach out to support@taxjar.com.
Please note that TaxJar for NetSuite requires a TaxJar Professional subscription.
Getting started with SuiteTax
Which tax engine is enabled in your NetSuite account?
SuiteTax
Installing the TaxJar bundle
Install the TaxJar Sales Tax Automation integration in your NetSuite account via the SuiteApp marketplace. Search for “SuiteApp Marketplace” in the NetSuite search bar. Search for “TaxJar” and install the TaxJar app. Once installed, the application ID will be com.taxjar.nstax
Enable SuiteTax Plugin
Once the TaxJar SuiteBundle is installed, you’ll first want to enable TaxJar as a tax calculation plugin for SuiteTax. Go to Customization > Plug-ins > Manage Plug-ins. Under Tax Calculation implementations, select the checkbox next to “TaxJar” and click Save.

Configuring TaxJar
Go to TaxJar > Setup > Configuration to connect your TaxJar account. Copy and paste your TaxJar API token in the field below:

Next, you’ll want to configure your tax settings. Enable calculations and/or reporting depending on the TaxJar features you want to use. Set a default sales tax payable and use tax receivable account for calculations:
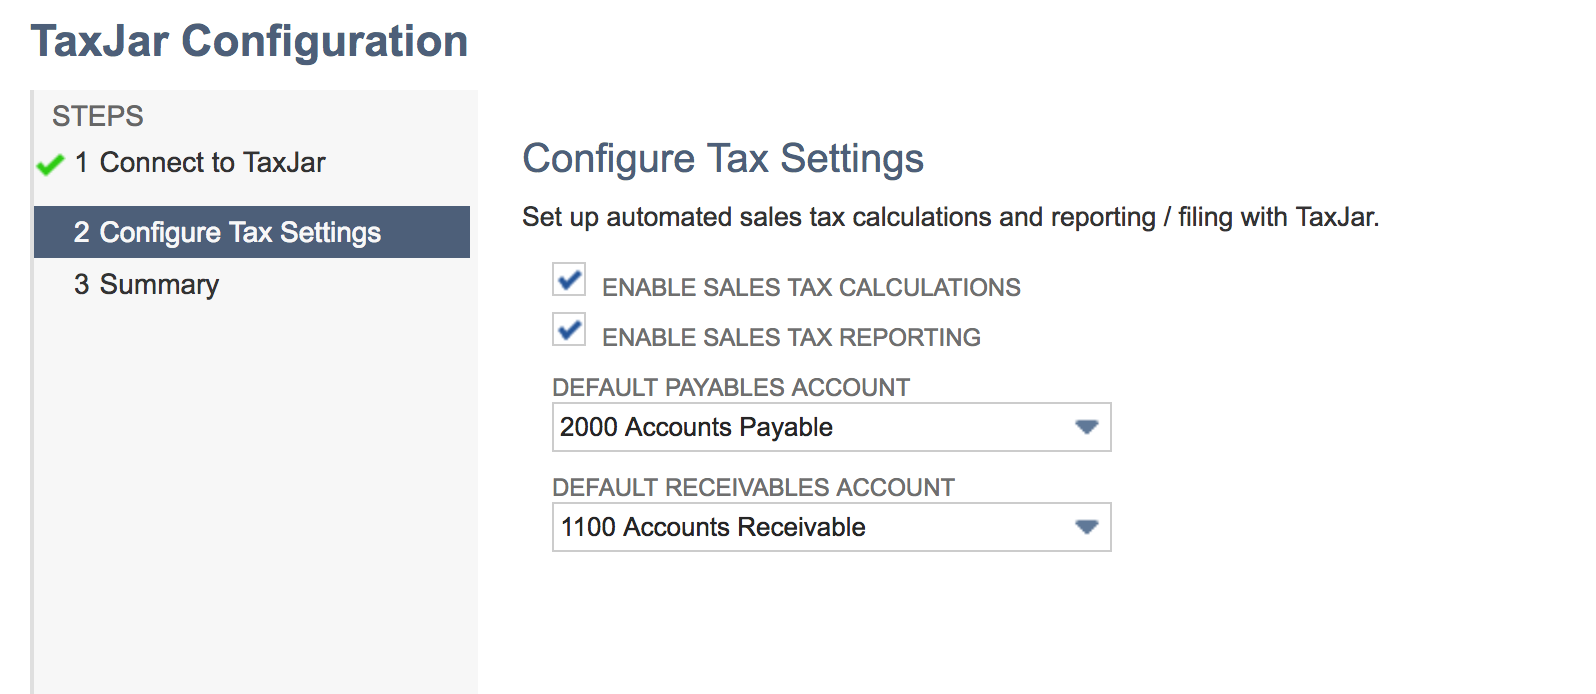
As TaxJar only provides sales tax calculations at this time (not use tax calculations), the payables sales tax account will be used to record the amount of sales tax you collect as a liability. If you’d like to use a different payables account for each nexus, you’ll need to edit the generated tax types under Setup > Accounting > Tax Types after performing initial calculations.
For sales tax reporting, we support accrual or cash basis accounting methods. For accrual basis accounting, open invoices and credit memos will be synced to TaxJar. If you prefer syncing paid-in-full invoices and fully applied credit memos, choose Cash Basis accounting:

Finally, you’ll be asked to review your NetSuite nexuses and tax registrations prior to using the TaxJar integration:

Configuring nexuses for SuiteTax
In order to calculate sales tax through SuiteTax, we’ll need to properly configure your NetSuite account to use TaxJar as the sales tax engine. Go to the TaxJar dropdown in your menu bar and select Nexuses from the Setup menu:
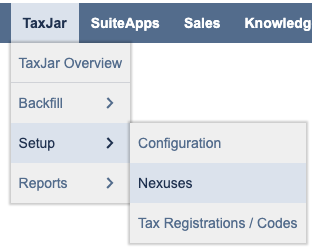
On the Nexuses page, set up all of the countries and regions where you need to collect sales tax. If you have been using Legacy tax, you may already have existing nexuses:

Make sure each subnexus in which you have a physical presence has a valid nexus address:

When making sales tax calculations, these nexuses are passed to TaxJar through our API to determine where you have nexus. These nexuses are not synced to your TaxJar account, so you will have to maintain nexuses separately in both NetSuite and TaxJar.
Configuring tax registrations for TaxJar
After you’ve set up your nexuses, you’ll want to assign them to tax registrations under your business subsidiaries. Go to the TaxJar dropdown in your menu bar and select Tax Registrations / Codes from the Setup menu:
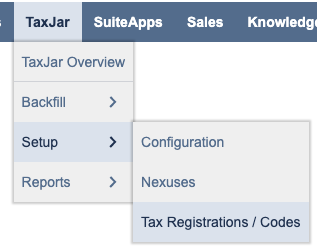
Click the Tax Registrations tab. If you are a NetSuite OneWorld customer, select the Subsidiary that you’d like to edit then click the Tax Registrations tab:

When adding a new nexus, make sure you choose TaxJar when selecting the tax engine for sales tax calculations.
Legacy tax
Installing the bundle for legacy tax
Install the TaxJar Sales Tax Automation integration in your NetSuite account via the SuiteApp marketplace. Search for “SuiteApp Marketplace” in the NetSuite search bar. Search for “TaxJar” and install the TaxJar app. Once installed, the application ID will be com.taxjar.nstax
Configuring TaxJar for legacy tax
Go to TaxJar > Setup > Configuration to connect your TaxJar account. Copy and paste your TaxJar API token in the field below:

Next, you’ll want to configure your tax settings. Enable calculations and/or reporting depending on the TaxJar features you want to use.

For sales tax reporting, we support accrual or cash basis accounting methods. For accrual basis accounting, open invoices and credit memos will be synced to TaxJar. If you prefer syncing paid-in-full invoices and fully applied credit memos, choose Cash Basis accounting:

Finally, you’ll be asked to review your NetSuite nexuses, set up tax codes, and assign those tax codes to your customers prior to using the TaxJar integration:

Configuring nexuses for legacy tax
In order to calculate sales tax, you will need to properly configure your NetSuite account to use TaxJar as the sales tax provider. Go to the TaxJar dropdown in your menu bar and select Nexuses from the Setup menu:

On the Nexuses page, set up all of the countries and regions where you need to collect sales tax. If you have been using Legacy tax in NetSuite, you may already have existing nexuses:

Make sure each subnexus in which you have a physical presence has a valid nexus address:

When making sales tax calculations, these nexuses are passed to TaxJar through our API to determine where you have nexus. These nexuses are not synced to your TaxJar account, so you will have to maintain nexuses separately in both NetSuite and TaxJar.
If you have NetSuite OneWorld, add the nexuses to each of your subsidiaries where applicable under Setup > Company > Subsidiaries:

Create a tax agency
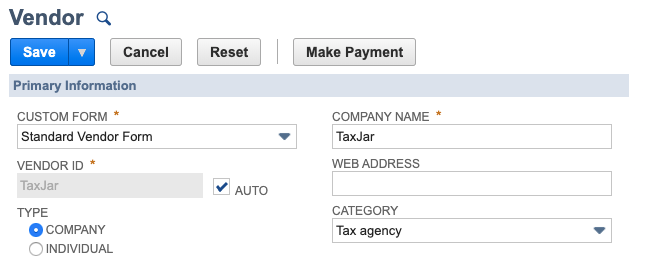
NetSuite will post the collected tax to a tax agency. Tax agencies are standard vendor records with a category of Tax agency. To create a tax agency for use with the TaxJar integration, navigate to Lists > Relationships > Vendors > New.
- Enter the following values
- Company Name: TaxJar
- Category: Tax agency
- For NetSuite OneWorld:
- Primary Subsidiary: Select the primary subsidiary for this vendor
- Click the Save button
Create a tax code for US customers
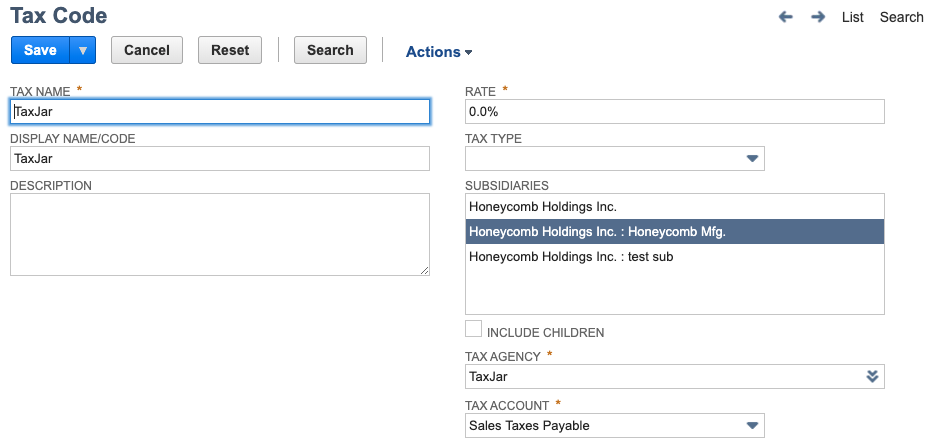
Tax codes must be set up with the right tax control accounts and tax types so that NetSuite can correctly post the taxes to your general ledger. To create a new tax code, navigate to TaxJar > Setup > Tax Registrations/Codes and click the New Tax Code button, then click on United States.

- Enter the following:
- Tax Name: TaxJar
- Display Name/Code: Sales Tax
- Rate: 0.0%
- Tax Agency: TaxJar
- Tax Account: Select the payables account where sales tax should accrue. If there is no tax control account, create a new one by navigating to Setup > Accounting > Tax Control Accounts > New.
- For NetSuite OneWorld:
- Subsidiaries: Choose one subsidiary per tax code. If you wish to calculate tax for multiple subsidiaries, create one tax code for each subsidiary.
- Click the Save button.
Review NetSuite tax settings
TaxJar requires the following settings to be checked under Setup > Accounting > Set Up Taxes for our Legacy Tax integration:

First, set the default tax code to “TaxJar.” Next, check the following checkboxes:
- Enable tax lookup on sales transactions
- Customers default to taxable
- Per-line taxes on transactions
- Respect discount item tax preference
Click the Save button to finish saving your native tax settings in NetSuite.
Assign the TaxJar tax item to a customer
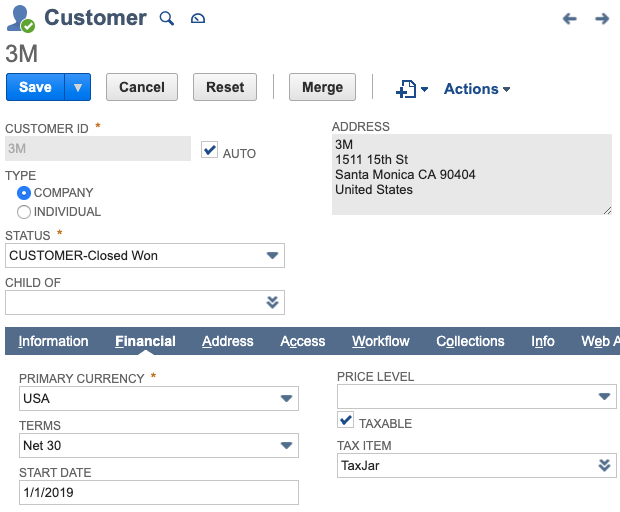
Tax codes need to be assigned to all of your customer records in the Tax Item field. To update the tax item for a single customer, navigate to Lists > Relationships > Customers.
- Find the customer you’d like to update and click Edit.
- Click on the Financial tab.
- Ensure that the Taxable box is checked.
- In the Tax Item field, select the TaxJar tax code created earlier.
- Click the Save button.
Assign the TaxJar tax item to multiple customers
You can use the bulk update features in NetSuite to add tax items to some or all of your customer records at once. To do this with the Mass Update feature, navigate to Lists > Mass Update > Mass Updates.
- Expand General Updates.
- Click on Customer.
- On the Criteria tab, enter the appropriate filters to identify which customers should be updated.
- Click on the Mass Update Fields tab.
- Check the Apply box next to each of the following fields and enter these values:
- Taxable: Checked
- Tax Item: TaxJar
- Click the Preview button.
- On the Mass Update Preview Results screen, click the Perform Update button.
The update will run in the background.
Set a default tax code for newly-created customers
You can set a default tax code to be assigned to every new customer that gets created. In OneWorld environments, you can set a different default tax code for each subsidiary.
- In a NetSuite OneWorld environment, navigate to Setup > Company > Subsidiaries and click Edit next to a subsidiary record.
- In a NetSuite Standard environment, navigate to Setup > Company > Company Information.
- In the TaxJar Default Tax Code field, select the tax code or tax group that you created for this subsidiary.
- Click the Save button.
Each new customer created in this subsidiary will automatically have the selected Tax Code assigned to it.
The TaxJar Legacy Tax custom role
A new custom role called TaxJar Legacy Tax is included in the TaxJar bundle for NetSuite. This role is used to ensure that our custom scripts have the minimum permissions needed to accurately calculate tax without requiring you to give your users access to records they might not otherwise have access to. In addition to permissions on TaxJar-specific records, this custom role has been given the following permissions:
- Edit level access to the following transaction types: Estimates, Opportunities, Sales Orders, Invoices, Cash Sales, Credit Memos, Cash Refunds, Return Authorizations, and Credit Memos.
- List > Tax Items > View in order to access Nexus record information.
- List > Subsidiary > View to read address information on subsidiary records.
- List > Locations > View to read address information on location records.
- List > Items > View to read TaxJar Category information on item records.
- List > Customers > View to read tax codes and the exemption status of customer records.
- List > Contacts > View was required to read exemption status on customer records.
The TaxJar Legacy Tax role should not be modified in any way as this may impact TaxJar’s ability to calculate tax in your environment.
Legacy Tax SuiteCommerce/SuiteCommerce Advanced Cart Tax
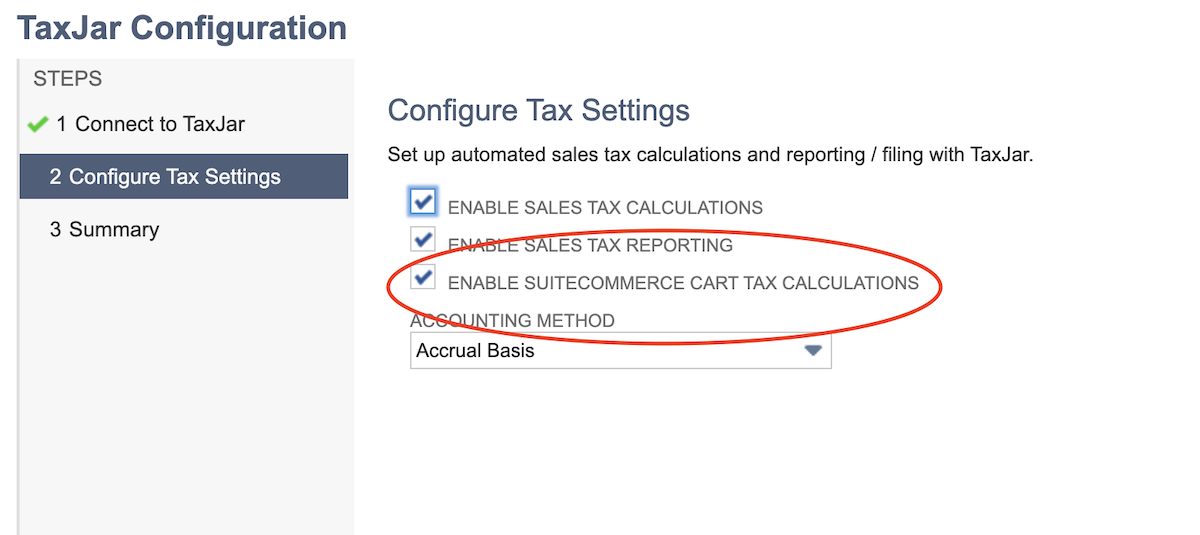
In order to enable SuiteCommerce or SuiteCommerce Advanced cart calculations, please follow the steps below:
* Navigate to TaxJar > Setup > Configuration.
* Check off the Enable SuiteCommerce Cart Calculations checkbox under the Configure Tax Settings step.
* Click the Next button.
* Click the Save button.
In order to enable scriptable cart for each applicable website:
* Navigate to Commerce > Websites > Website List.
* Click Edit next to the site in which to activate the TaxJar script.
* On the Setup tab in the Preferences section, check off the “Scriptable Cart and Checkout” checkbox.
* Click the Save button.
In order to ensure no custom item column fields are exposed (otherwise TaxJar custom category field will be exposed to users):
* Navigate to Commerce > Websites > Configuration.
* Select the web store (this step will need to be followed for each web store).
* Under the Shopping Catalog tab, select the Item Options sub-tab, and check off the “Show Only Items Listed In: Item Options and Custom Transaction Column Fields” checkbox.
* Click the Save button.
Product Exemptions & Taxability
To assign a specific item in NetSuite to a TaxJar product category for exemptions, simply edit the item and click the TaxJar tab. Select a TaxJar category and save the item:
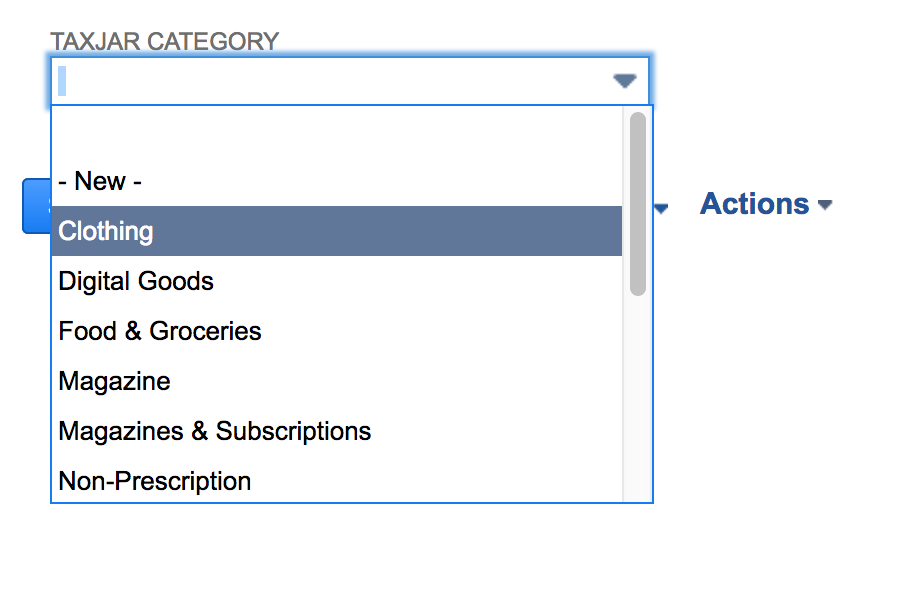
For assigning items in bulk to a given TaxJar category, use the mass update feature under Lists > Mass Update > Mass Updates and select an item type under General Updates.
You can review all of your categorized items under TaxJar > Reports > Exempt Items.
Customer Exemptions & Taxability
To exempt a specific customer in NetSuite for calculations and reporting, edit the customer and click the TaxJar tab. Check the TaxJar Exempt checkbox and select an exemption type from the dropdown:
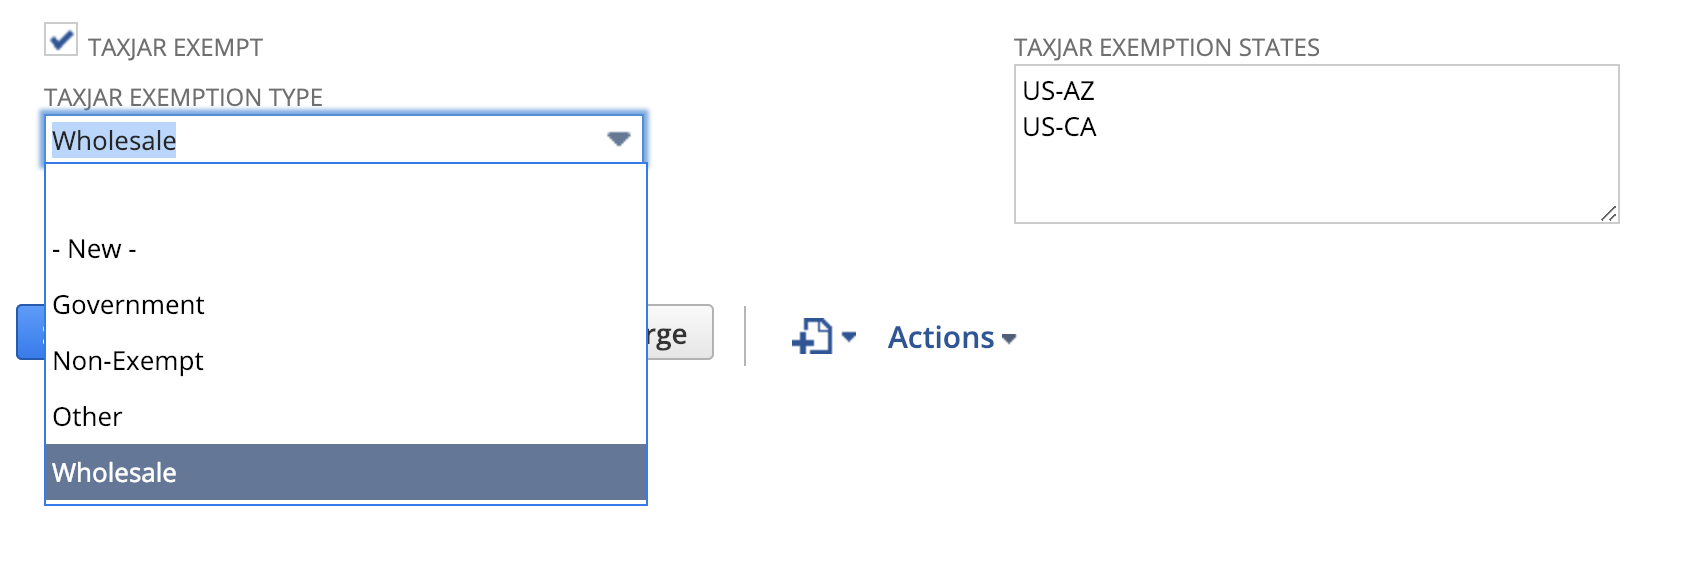
If a customer provides an exemption certificate that’s valid only for certain states, you can select those states in the TaxJar Exemption States field. If this field is blank, TaxJar will assume they are exempt everywhere. If there are states selected in this box, TaxJar will assume they are exempt only in those states and will calculate sales tax on orders for other states.
If you decide to perform a mass update on your customer records to exempt a batch of customers from sales tax, they’ll automatically enqueue and sync to TaxJar. To manually backfill customers, go to the TaxJar dropdown in your menu bar and select Backfill > Backfill Records, then select Customers in the Backfill Type field:
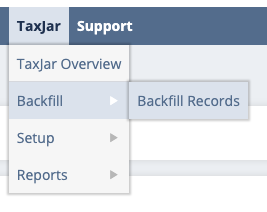
You can review all of your exempt customers under TaxJar > Reports > Exempt Customers.
Order Exemptions & Taxability
To exempt an individual order rather than a customer, click the TaxJar tab on a transaction and select an exemption type from the dropdown:
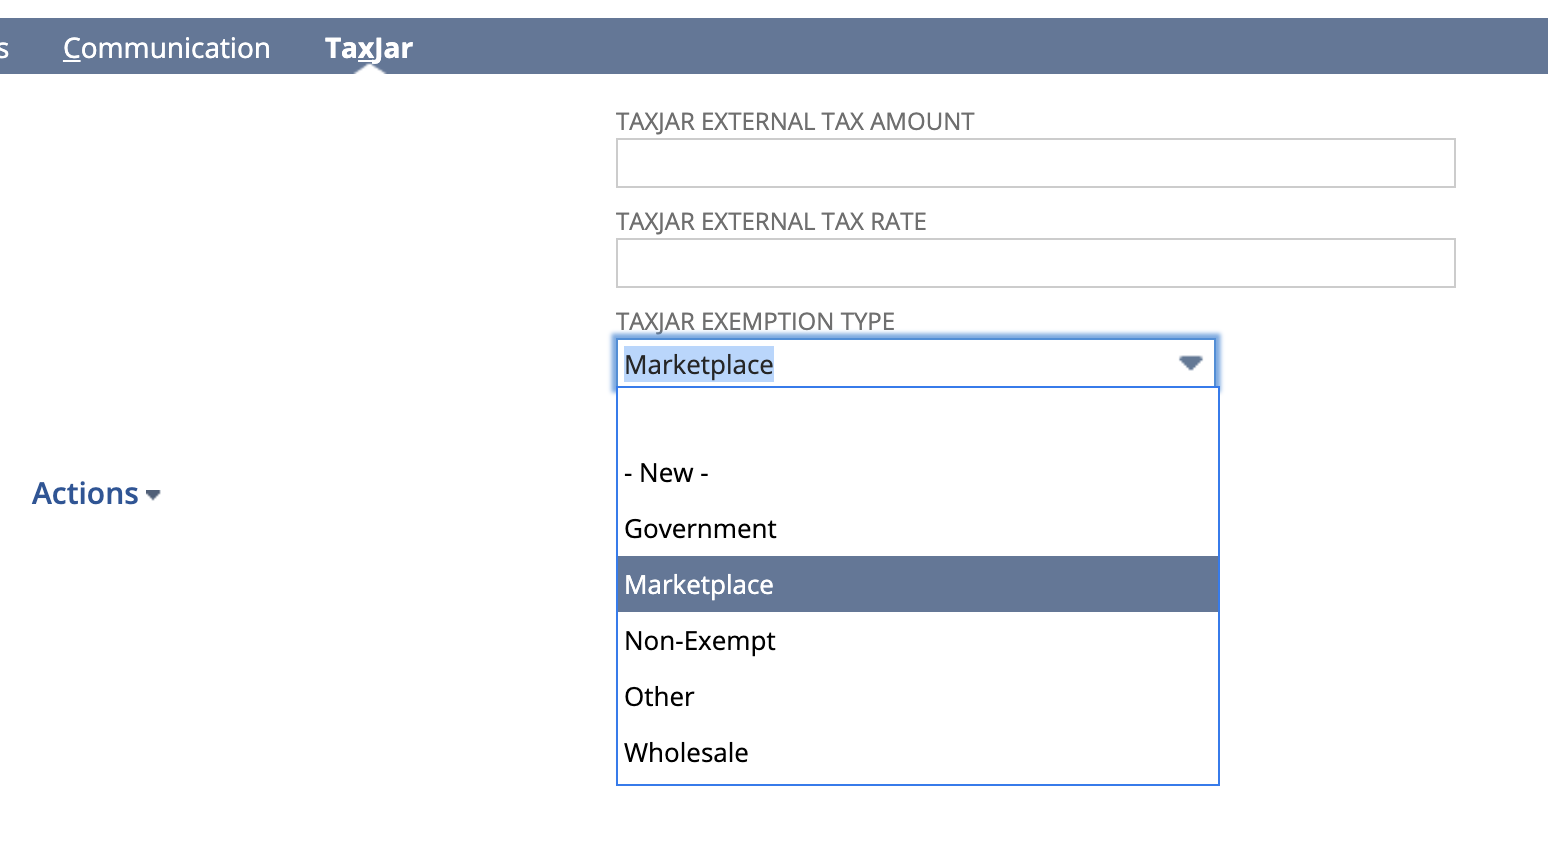
If you sell on a marketplace that TaxJar doesn’t support yet, you can use the Marketplace exemption to designate an order as custom marketplace exempt. TaxJar will automatically determine if the order is shipped to a state with a marketplace facilitator law and handle it accordingly for reporting/filing.
If you have exempt customers that are sometimes taxable for specific orders, you can also use the TaxJar Exemption Type dropdown to set an order as Non-Exempt. This will override the customer exemption and allow you to collect sales tax on an order for a customer who would typically be exempt from sales tax.
Multiple TaxJar Accounts
In a NetSuite OneWorld environment, it is possible to link individual subsidiaries to different TaxJar accounts. This might be helpful for a scenario in which each subsidiary, or legal entity, maintains a different tax registration with individual states. Syncing transactions to different TaxJar accounts allows TaxJar to file separately for those legal entities. After signing up for one or more new TaxJar accounts, generate an API token for each account. Then:
- In NetSuite, navigate to Setup > Company > Subsidiaries.
- Click Edit next to the subsidiary whose transactions should go to a separate TaxJar account.
- In the TaxJar API Token field, enter the API token for the TaxJar account this subsidiary should use.
If you only use one TaxJar account, you do not need to enter an API token on your subsidiary records. The default token has already been specified in the TaxJar configuration process.
Sales Tax Adjustments
If you need to refund sales tax on a previous order for a customer that was processed prior to exempting them, we recommend fully refunding the order and making a copy of the original order via Actions > Make Copy.
Address Validation
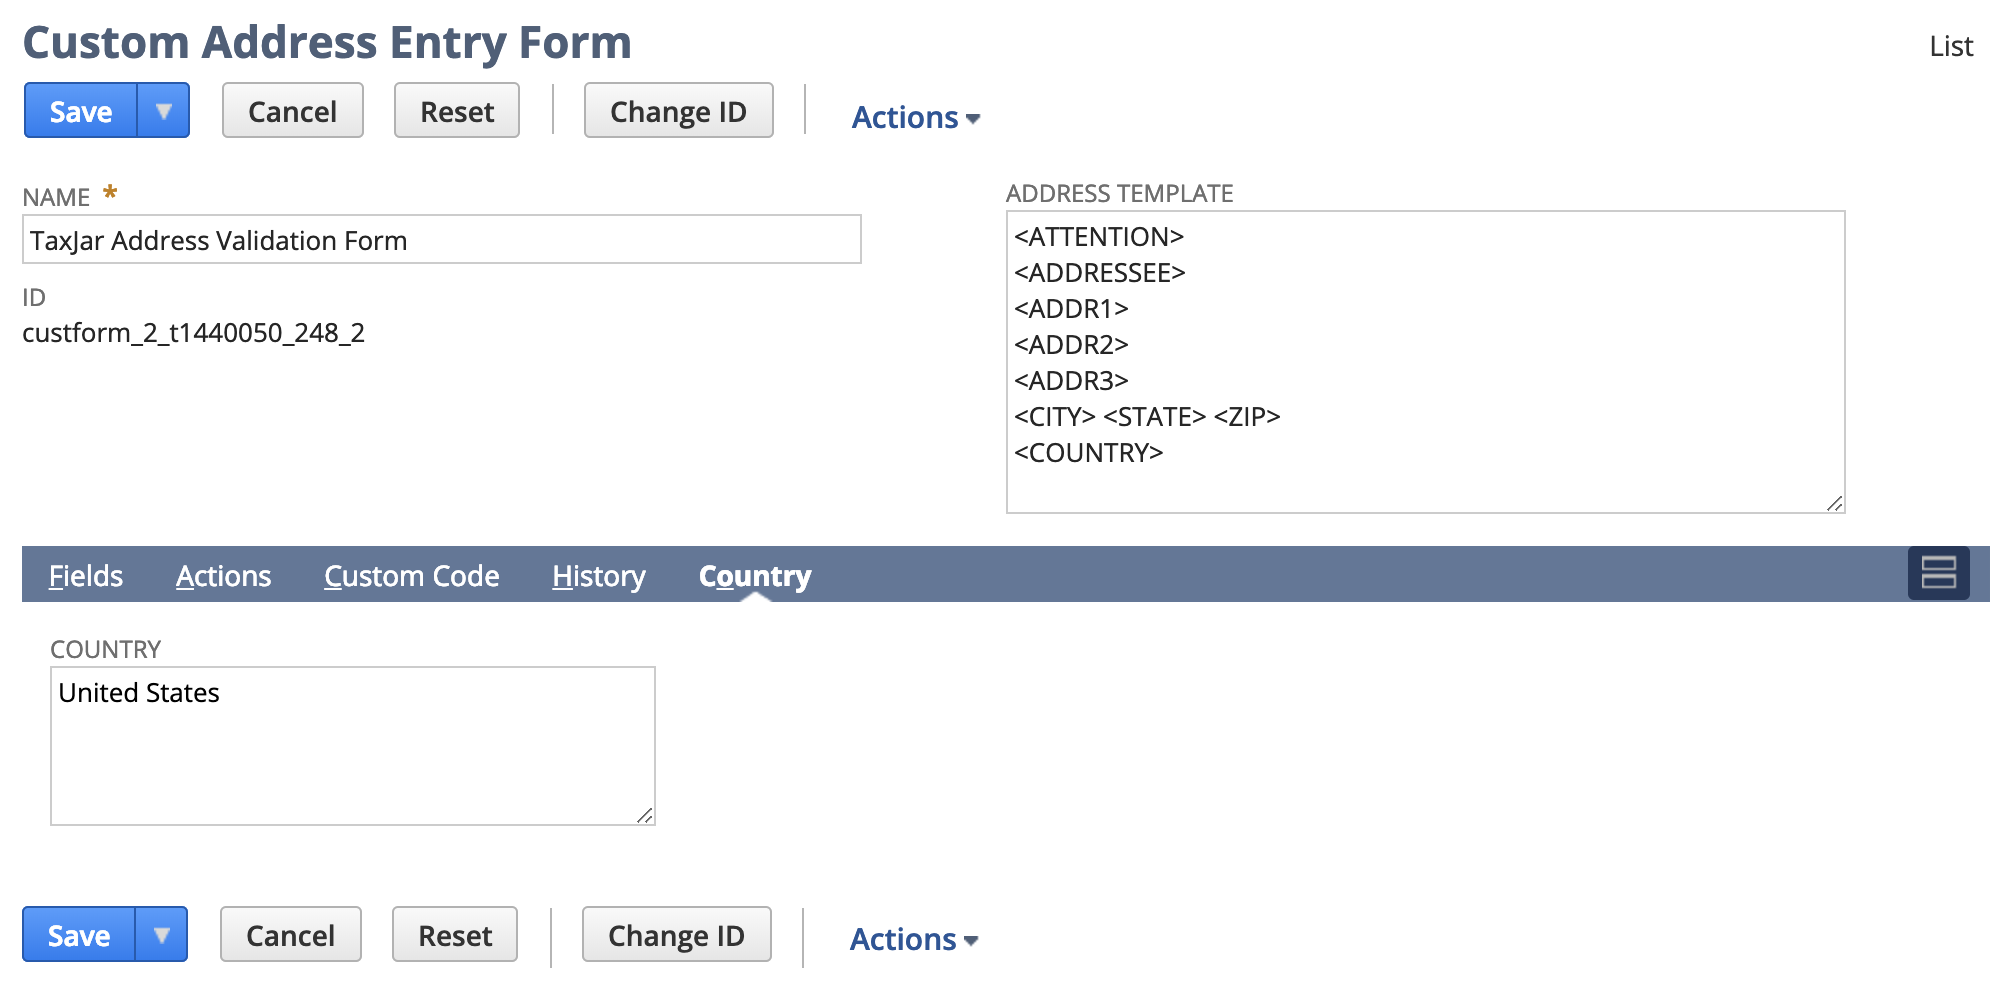
TaxJar provides US address validation directly inside NetSuite to ensure valid addresses are sent to our API for accurate sales tax calculations. To set up address validation, go to Customization > Forms > Address Forms. You’ll find a custom address form named “TaxJar Address Validation Form”:

Click the “Edit” link and go to the “Custom Code” tab. Select tj_validate_address.js as the script file:
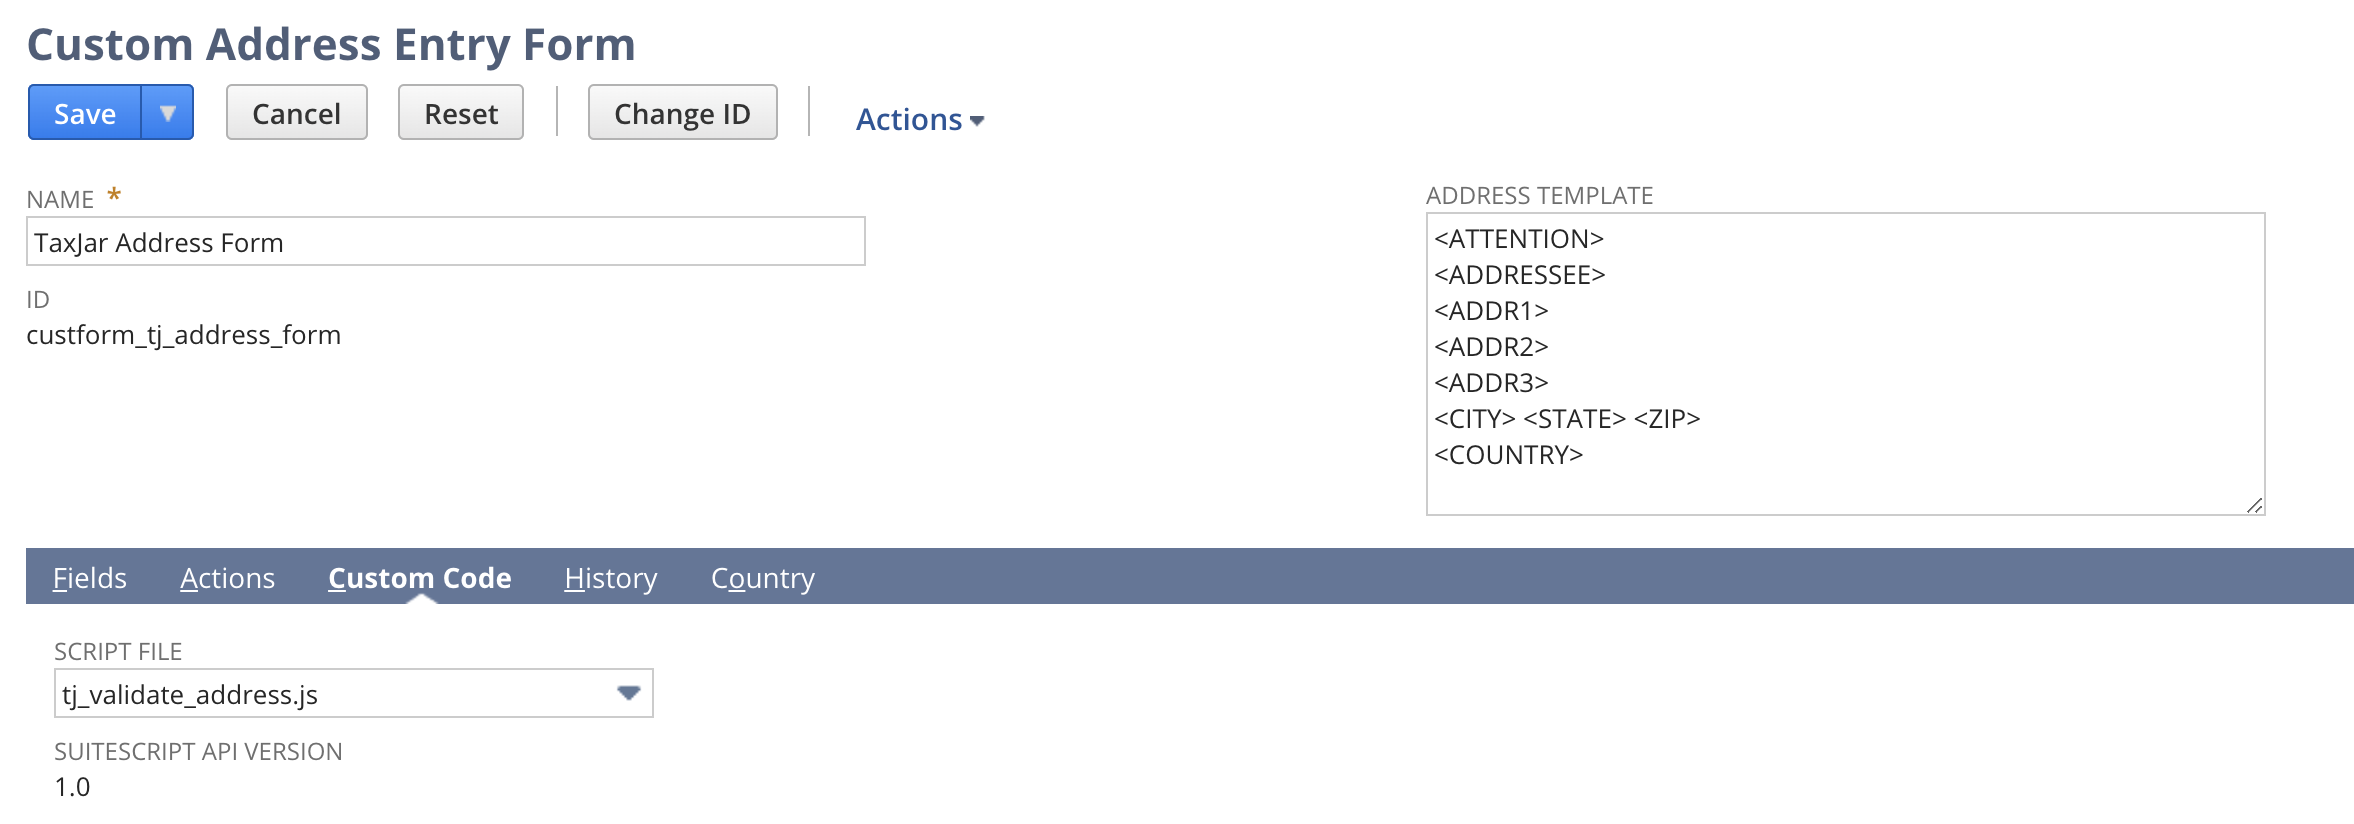
Next, click the “Country” tab to enable the form in the United States:
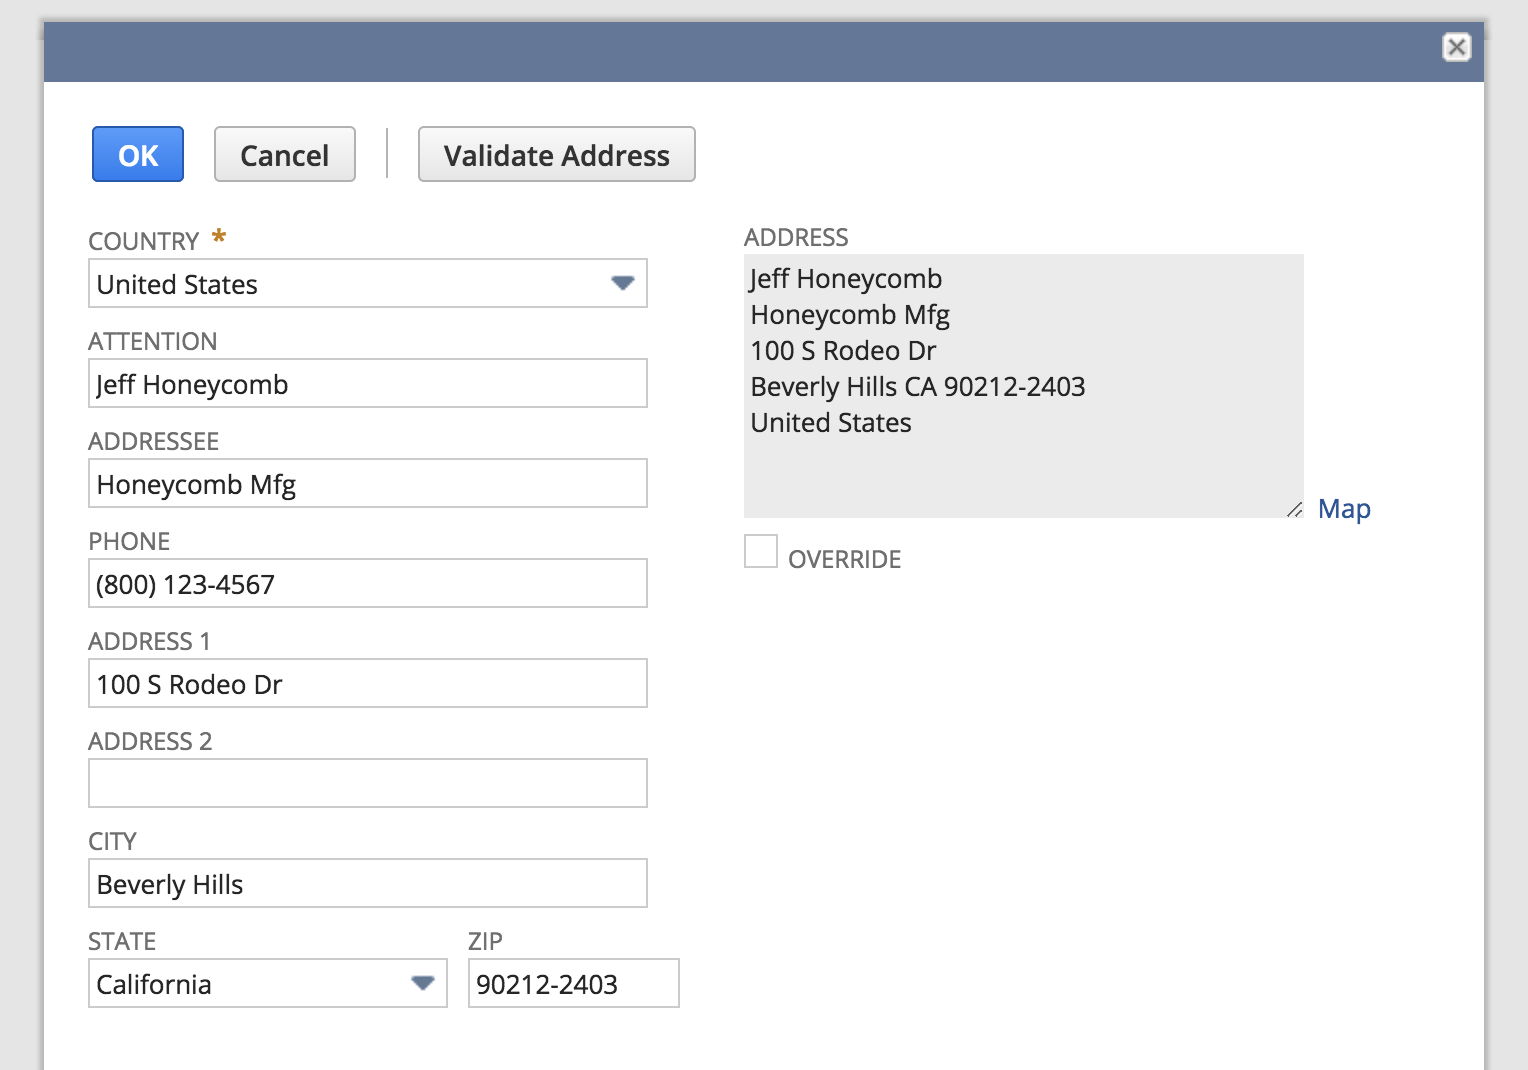
You can now validate addresses anywhere in NetSuite! Upon clicking the “Validate Address” button, we’ll automatically clean up the address and add a ZIP+4 postal code:
Discount Items
Order-level discounts and line discounts should behave similar to native NetSuite behavior for both sales tax calculations and reporting/filing. Discounts added as a line item to an order will discount the preceding line item.
If you use discount items for gift card redemptions or other scenarios which may require applying the discount after calculating tax, use the “Apply After Tax” checkbox on the “TaxJar” tab when configuring a discount item:

Sales Tax Calculations
TaxJar directly integrates with NetSuite and provides sales tax calculations for the following records in NetSuite:
- Quotes
- Opportunities
- Sales orders
- Invoices
- Cash sales
- Credit memos
- Cash refunds
- Return authorizations
Before making a calculation, TaxJar requires a valid shipping address and one or more line items in a given record. After providing this information, click the Preview Tax button to get a summary of sales tax organized by jurisdiction:
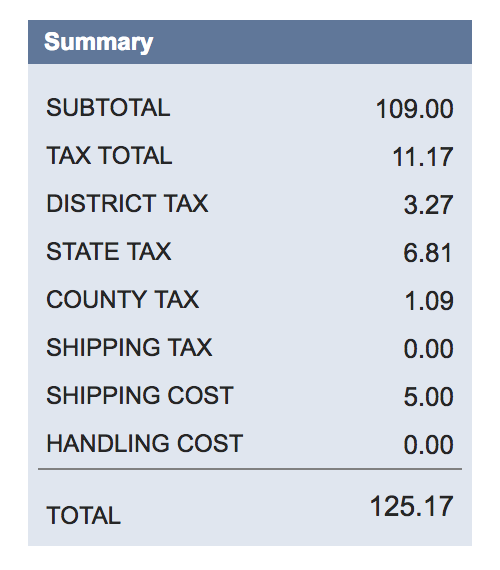
For US calculations, this summary may include state, city, county, and district tax. You’ll also notice the tax is broken out for each line item under the Tax Details tab:

Once a record is processed, the underlying tax types and tax codes may be referenced in your NetSuite Tax Report under Reports > Financial > Tax Report (SuiteTax only). You can review the underlying API requests and responses under TaxJar > Reports > Logs to verify calculations.
If you save the record before previewing tax, don’t worry. TaxJar will automatically calculate sales tax after you save a record.
Backup Rates
When sales tax is previewed or calculated, a request is made to our API through SuiteTax. In the unlikely event that our API is unavailable (we boast 99.99% uptime), we’ll apply a backup rate as a fallback to ensure you collect sales tax. A backup rate is an average tax rate across all postal codes in a given region or country.
After configuring the integration, we’ll retrieve backup rates for every region and country we currently support and store the rates directly inside NetSuite. Each month we’ll update the rates using a scheduled script for accurate backup calculations.

You can review the current backup rates under TaxJar > Reports > Backup Rates.
Skip & Override Calculations
When importing orders from an external platform such as Shopify, Amazon, eBay, or a custom homegrown system, you may want to skip API calculations and bring in the sales tax you’ve already collected “as-is”. TaxJar makes it easy to pass in a custom field and generate the tax details for SuiteTax. You can set this field using a NetSuite connector such as Celigo/FarApp, CSV imports, or your own SuiteTalk web services integration.
Use one of the following custom transaction body fields to import tax for an order without recalculating tax in SuiteTax:
custbody_tj_external_tax_amountfor order-level sales tax amountscustbody_tj_external_tax_ratefor order-level sales tax rates
To test out this functionality, you can also edit these fields directly inside the TaxJar subtab on a transaction record. Click the Preview Tax button or save the record to apply the tax.
If your platform records sales tax at the line level, you can use one of the following custom transaction column fields to import tax for each line item:
custcol_tj_external_tax_amountfor line-level sales tax amountscustcol_tj_external_tax_ratefor line-level sales tax rates
Regarding marketplace-facilitated transactions, for which a marketplace (e.g., Amazon) collects taxes and remits them on your behalf, external tax can be excluded from the transaction total. In order to prevent the external tax amount or rate (order-level or line-level) from being included in the transaction total and prevent it from impacting GL, check off the transaction body checkbox custbody_tj_exclude_external_tax for a particular transaction.
Will Call Shipping
If you allow customers to pick up orders at your storefront or warehouse, use the “Will Call” shipping option to calculate sales tax based on the location of the order instead of the shipping address:
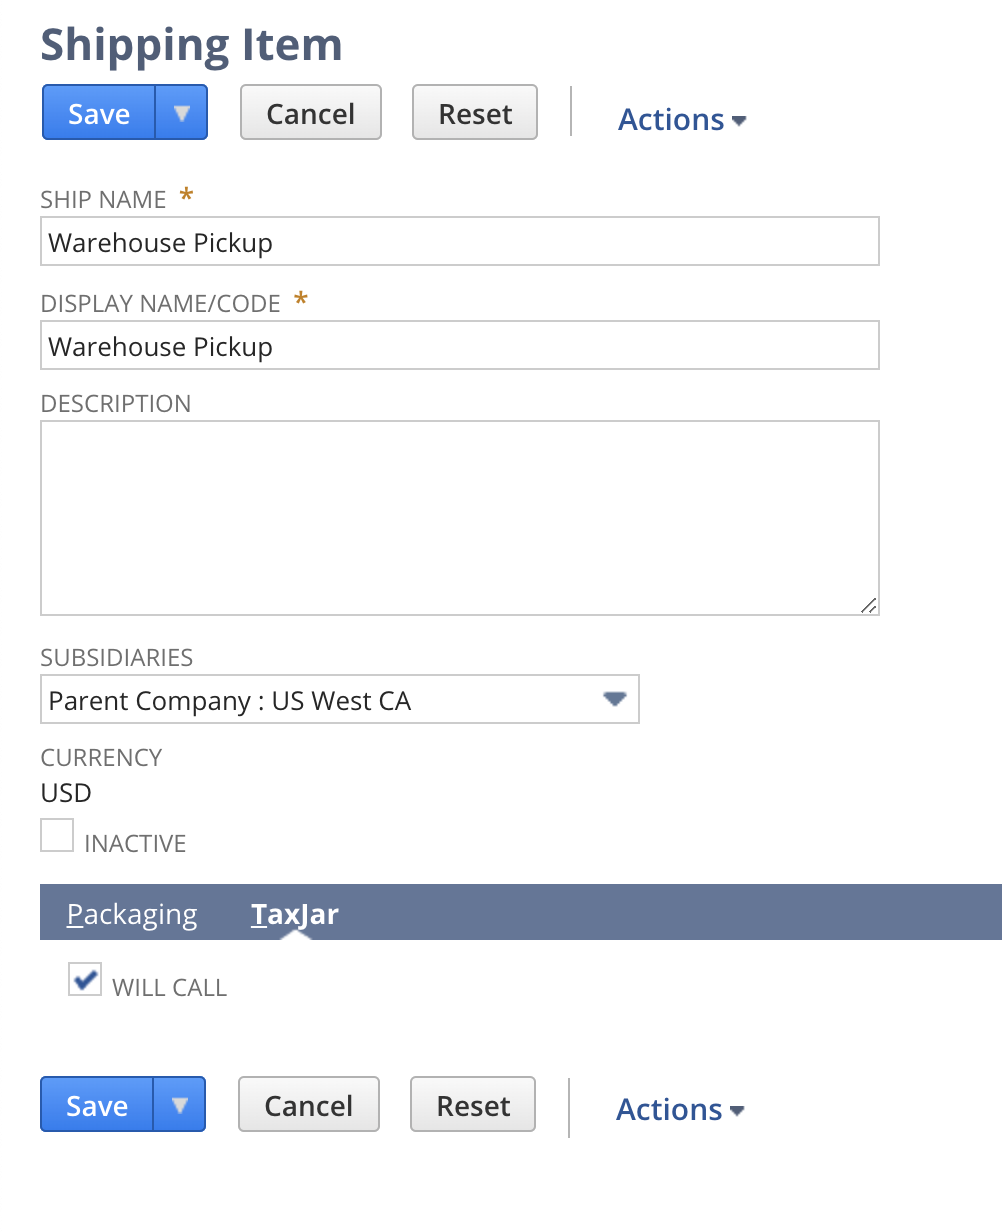
Will Call shipping is available under the “TaxJar” subtab for shipping items via Lists > Accounting > Shipping Items and individual orders.
Calculate Tax with SuiteScript
Developers can manually trigger a sales tax calculation within SuiteScript for both Legacy Tax and SuiteTax. This can be useful after a record is programmatically created or in certain scenarios where tax may not be calculated before another action must take place, such as authorizing a credit card charge.
To calculate sales tax in SuiteScript with Legacy Tax, use the calculateTax and buildTaxDetails methods after including the tj_leg_calculations_public module. Keep in mind these methods do not support records in dynamic mode.
`define([`
  `'N/record',`
  `'/SuiteBundles/Bundle 265097/com.taxjar.salestax/tj_leg_calculations_public'`
`], function (record, taxjar) {`
    `// ...`
    `var rec = record.load({ type: record.Type.SALES_ORDER, id: 10257 });`
    `taxjar.calculateTax(rec);`
    `taxjar.buildTaxDetails(rec);`
    `// ...`
`}`
To calculate sales tax in SuiteScript with SuiteTax, use the record.Macro.CALCULATE_TAX macro:
`define([`
  `'N/record'`
`], function (record) {`
    `// ...`
    `var rec = record.create({ type: record.Type.SALES_ORDER, isDynamic: true });`
    `rec.executeMacro({ id: record.Macro.CALCULATE_TAX });`
    `// ...`
`}`
Sales Tax Reporting
TaxJar automatically syncs invoices, cash sales, credit memos, and cash refunds for sales tax reporting and filing. This is done automatically behind the scenes when one of these records is created or updated inside NetSuite. To backfill older transactions from NetSuite into TaxJar, go to the TaxJar dropdown in your menu bar and select Backfill > Backfill Records, then select Transactions in the Backfill Type field:

From there, use the datepickers in the Start Date and End Date to select a date range of transactions to backfill:
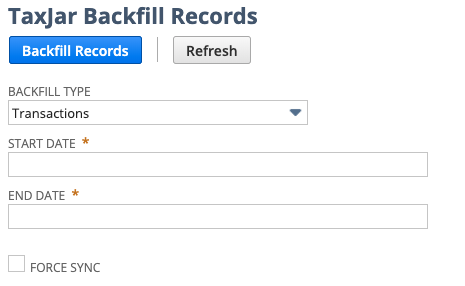
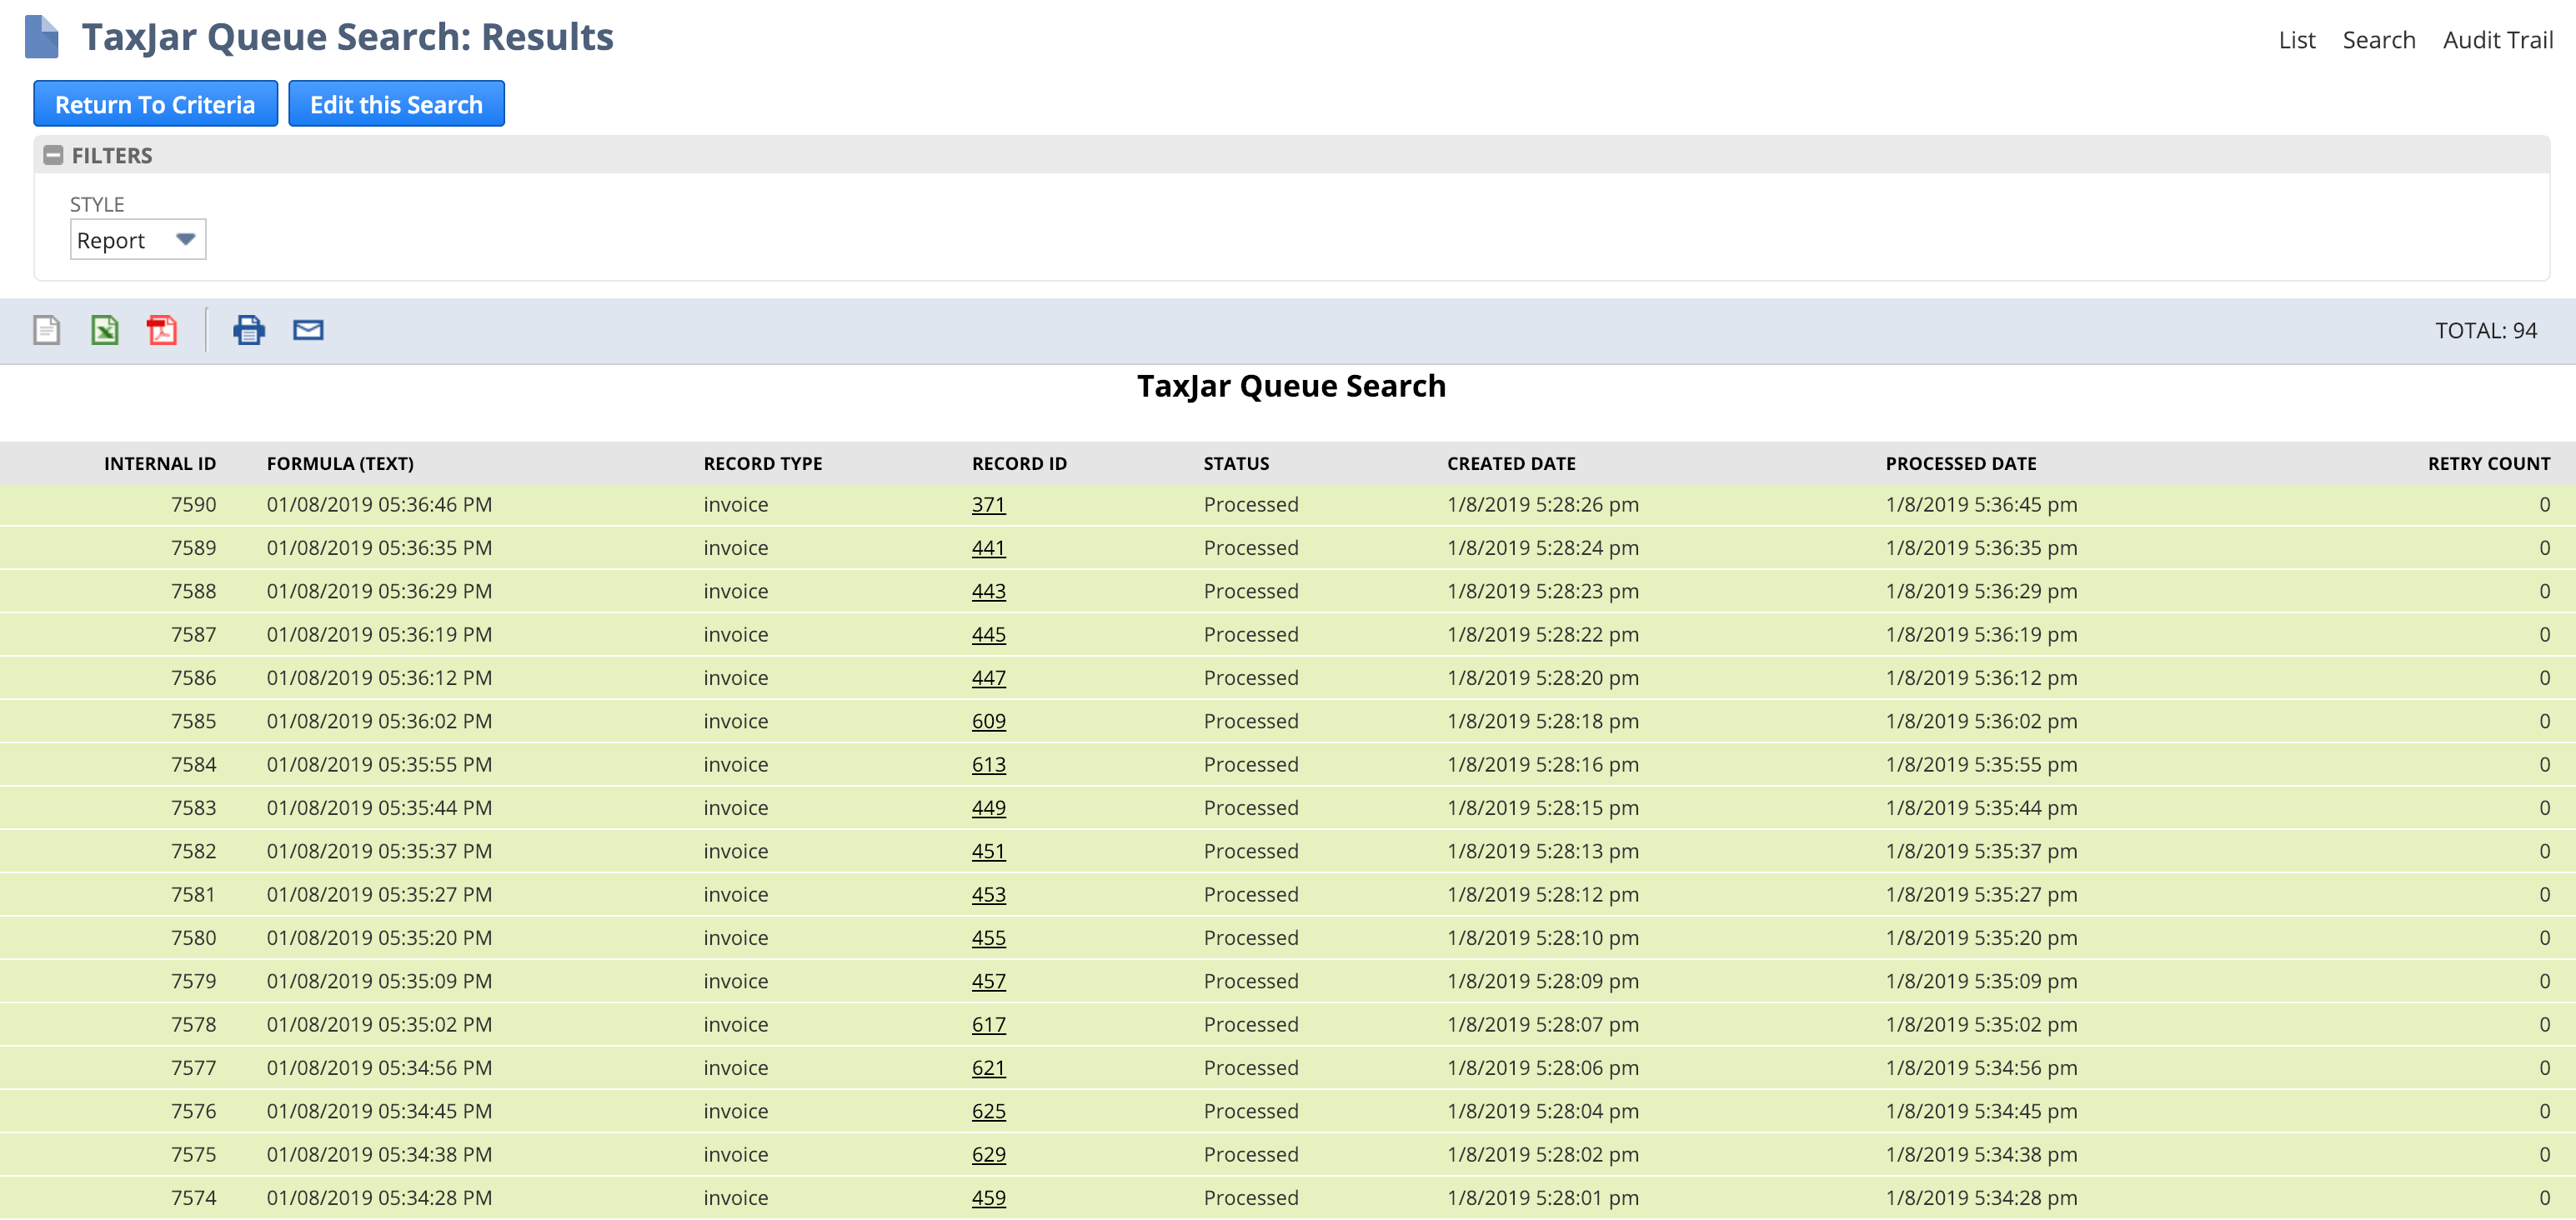
Click Backfill Records and transactions with a transaction date within that range will be queued for syncing. To monitor the queue system, go to TaxJar > Reports > Queue to view pending, processed, and invalidated transactions:
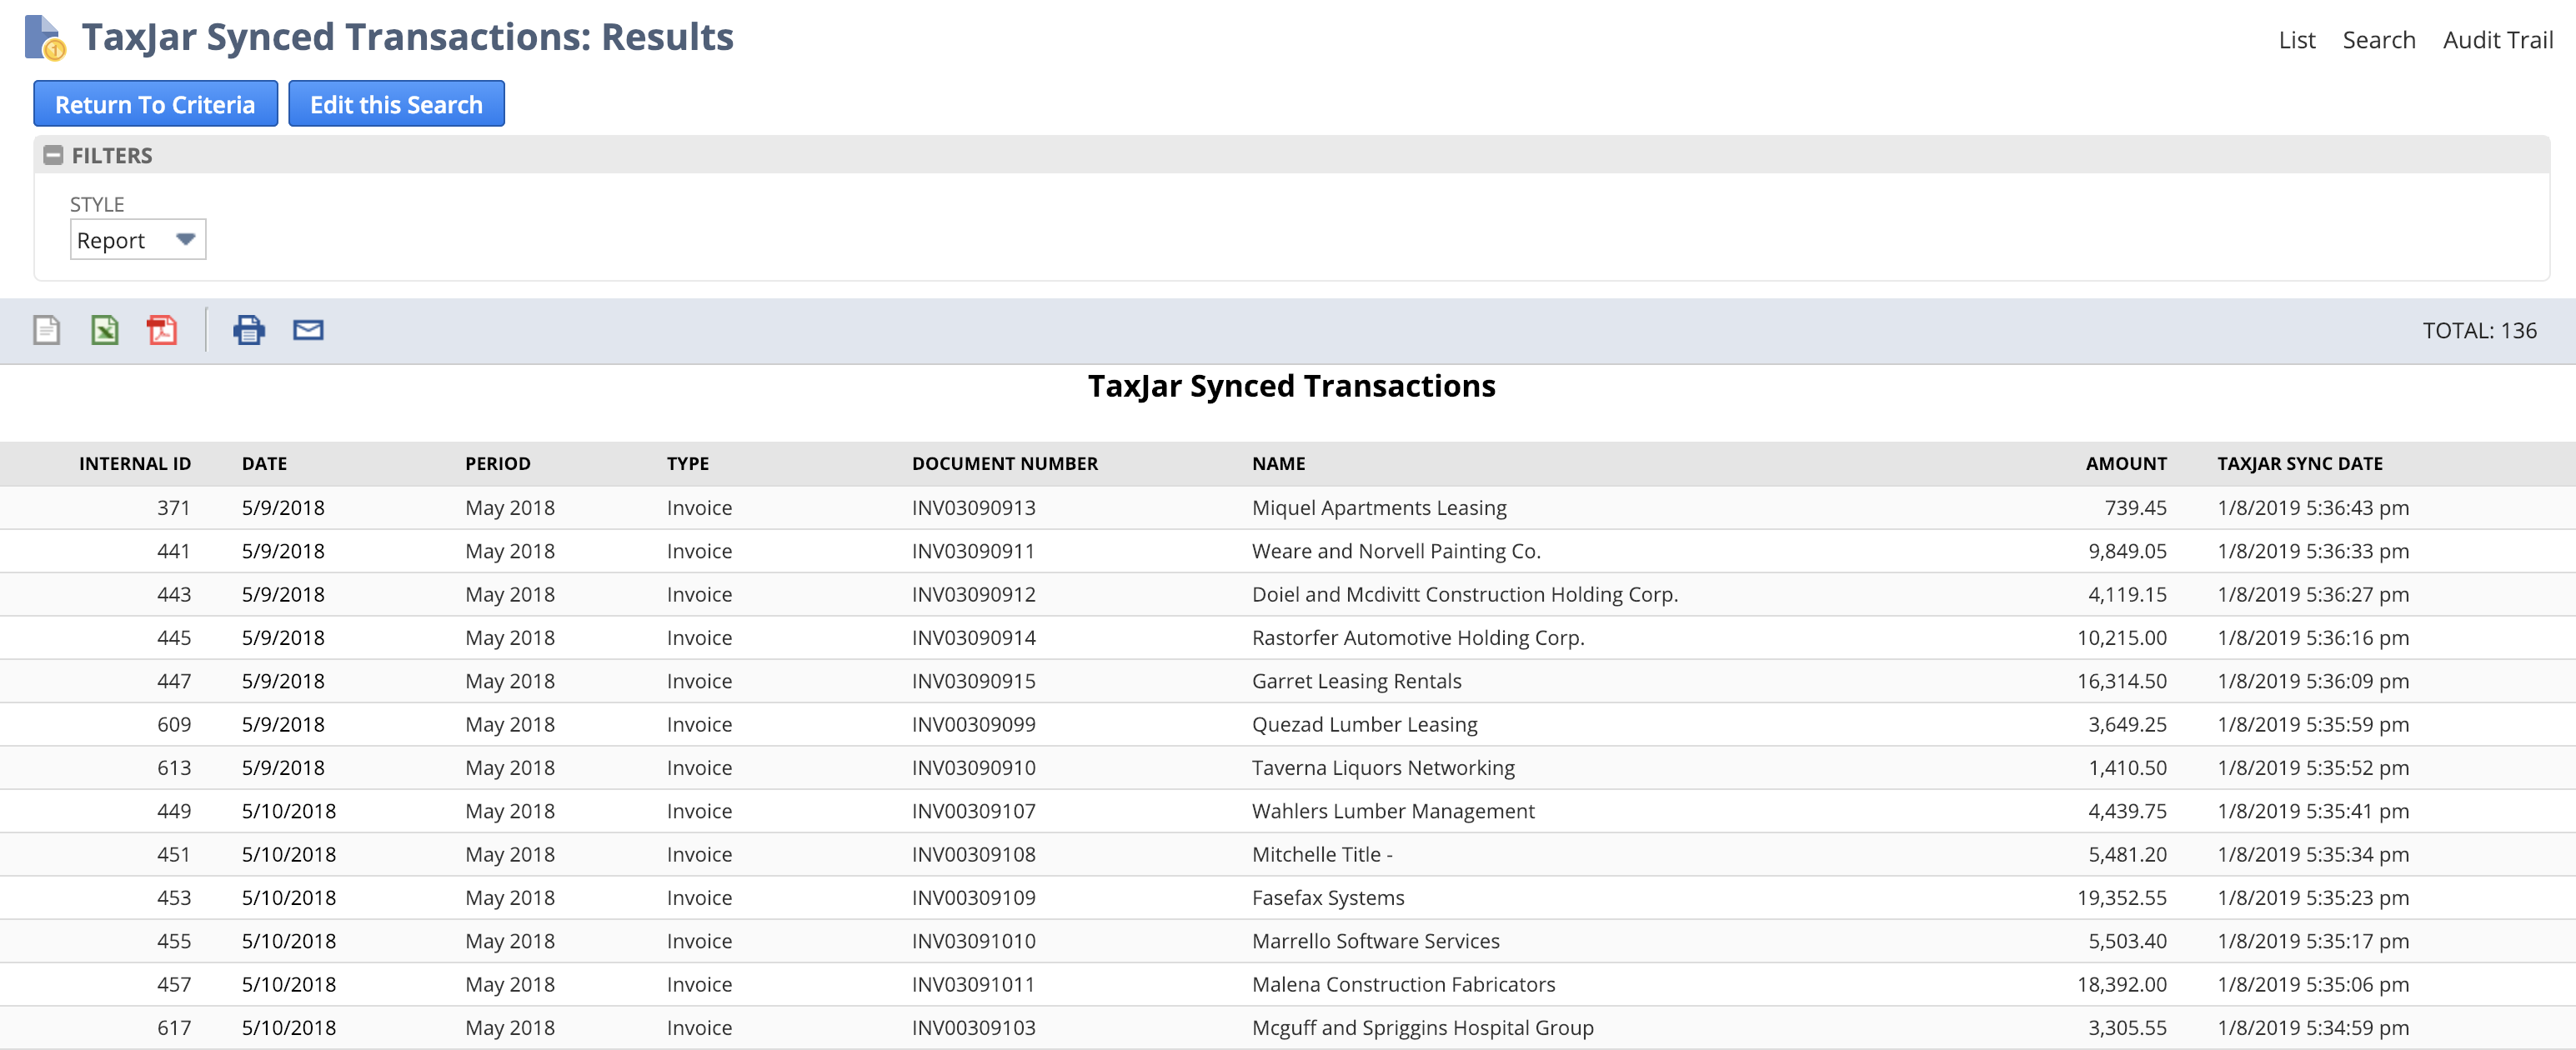
You can browse and filter through all of your synced transactions under TaxJar > Reports > Synced Transactions:
Transaction States
For accrual basis accounting, TaxJar imports open invoices and credit memos. For cash basis accounting, TaxJar only imports paid in full invoices and fully applied credit memos. Cash sales and cash refunds are always synced over. Additionally, only transactions shipped to the US with USD currency are synced to TaxJar. At this time TaxJar only supports reporting and filing in the United States.
After a customer payment is recorded, any associated invoices will be synced if they’re in a paid in full status.
After a customer refund is recorded, any associated credit memos will be synced if they’re in a fully applied status.
Standalone Refunds
If you create credit memos or cash refunds separately from an invoice or cash sale in NetSuite, you may want to specify a reference transaction that links the refund to the original order before syncing the refund to TaxJar. Click the TaxJar subtab on a refund transaction and select a synced order from the TaxJar Reference Transaction field:
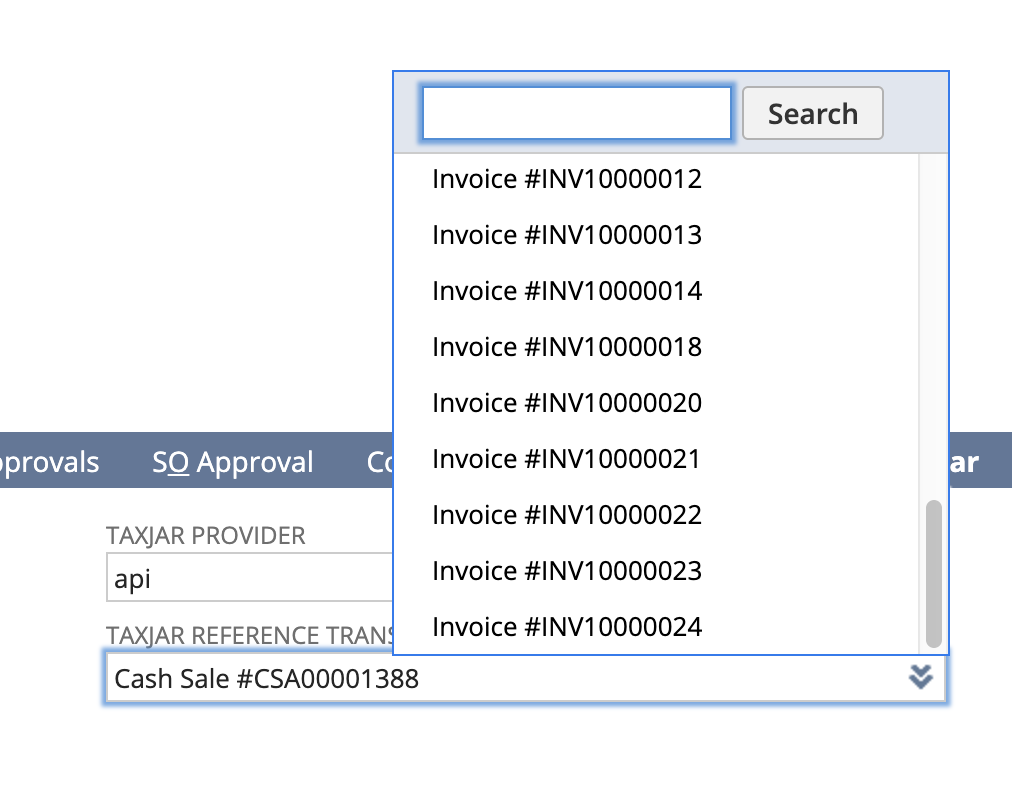
After saving, our integration will reference this transaction as a fallback if we can’t find an originating order for the refund.
Marketplace Exemptions
If you sell on marketplaces such as Amazon, eBay, Etsy, or Walmart and import orders from these channels into NetSuite, you can designate them as marketplace exempt for TaxJar reporting and filing. Simply change the TaxJar Provider field from “api” to “amazon”, “ebay”, “etsy”, or “walmart” when editing a transaction:

You can also set a provider for many transactions at once using the mass update feature under Lists > Mass Update > Mass Updates. After doing so, make sure to backfill these transactions into TaxJar via TaxJar > Backfill > Transactions.
Import marketplace transactions using a connector via SuiteTalk / web services? You can programmatically set the transaction body custom field custbody_tj_provider to the channel of your choice before creating the order or refund in NetSuite.
Skipping / Filtering Transactions
If you’d like to skip specific transactions from syncing to TaxJar, you can use the “Skip TaxJar Sync” checkbox on individual transactions on the “TaxJar” subtab:

For skipping transactions in bulk, use the mass update feature under Lists > Mass Update > Mass Updates and select Invoice, Cash Sale, Credit Memo, or Cash Refund under General Updates > Transaction Types.
Import transactions using a connector via SuiteTalk / web services? You can programmatically set the transaction body custom field custbody_tj_sync_skip to true (T) or false (F) based on your given logic or criteria.
Skipping Subsidiary Transaction Calculations or Transaction Sync Process
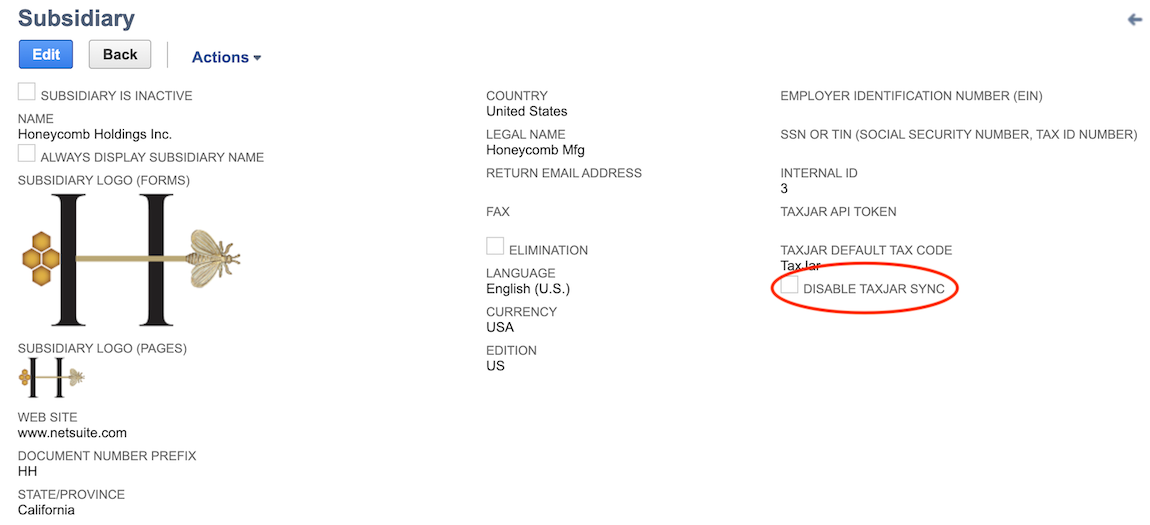
If you’d like to prevent a specific subsidiary’s transactions from syncing with TaxJar, you can use the “Disable TaxJar Sync” checkbox on a specific subsidiary record:
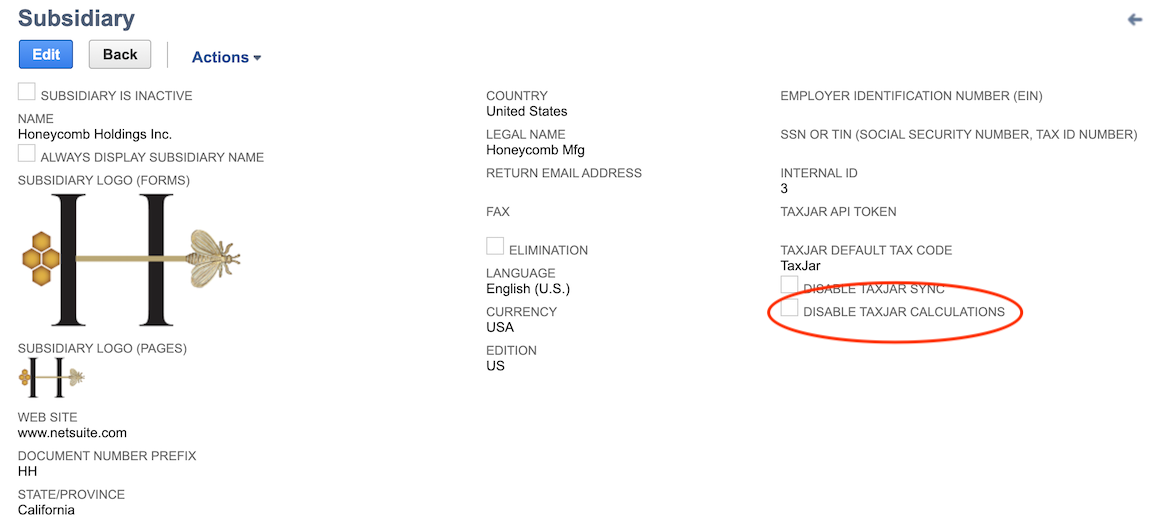
For Legacy Tax environments, if you’d like to prevent tax calculations from being carried out for a specific subsidiary’s transactions, you can use the “Disable TaxJar Calculations” checkbox on a specific subsidiary record:
Sync Permissions
If you receive INSUFFICIENT_PERMISSION error notifications from NetSuite after installing the TaxJar bundle, you may need to update access for non-administrator roles or update script deployments to execute as a specific role under Customization > Scripting > Script Deployments. For security reasons, our integration defaults the execution to “Current Role” for script deployments instead of “Administrator”.
To allow specific roles to enqueue and sync transactions in real-time after saving an invoice, cash sale, cash refund, or credit memo, make sure the role has the “Custom Record Entries” permission. Alternatively, change the following script deployments to execute as an “Administrator” role:
- customdeploy_tj_sync_orders_cashsales
- customdeploy_tj_sync_orders_custpayments
- customdeploy_tj_sync_orders_invoices
- customdeploy_tj_sync_refunds_cashrefunds
- customdeploy_tj_sync_refunds_creditmemos
- customdeploy_tj_sync_refunds_custrefunds
- customdeploy_tj_sync_customers
Current Limitations
The following items are currently unsupported by TaxJar in NetSuite:
- If “Item Line Shipping” is enabled, TaxJar will use the first line item shipping address for calculations and reporting. At this time, TaxJar does not support multiple shipping addresses through our API.
- TaxJar does not currently support use tax calculations for the following record types: Credit card charge, credit card refund, purchase order, vendor bill, vendor credit, vendor return authorization. Calculations will be skipped for these record types when attempting to estimate or record tax via SuiteTax.
- Legacy Tax environments currently have the following known limitations:
- Only partial support for Site Builder. Sales tax is calculated with the order is submitted but is not shown when the shopping cart is viewed before checkout.
- It does not currently support separate G/L accounts for individual tax agencies.
NetSuite tutorial
To ensure your NetSuite integration is set up successfully, we have two NetSuite video tutorials that can provide further tips and best practices.
Support resources
If you have additional questions or need help integrating NetSuite and TaxJar, please contact our support team.
