Building the TaxJar API Demo
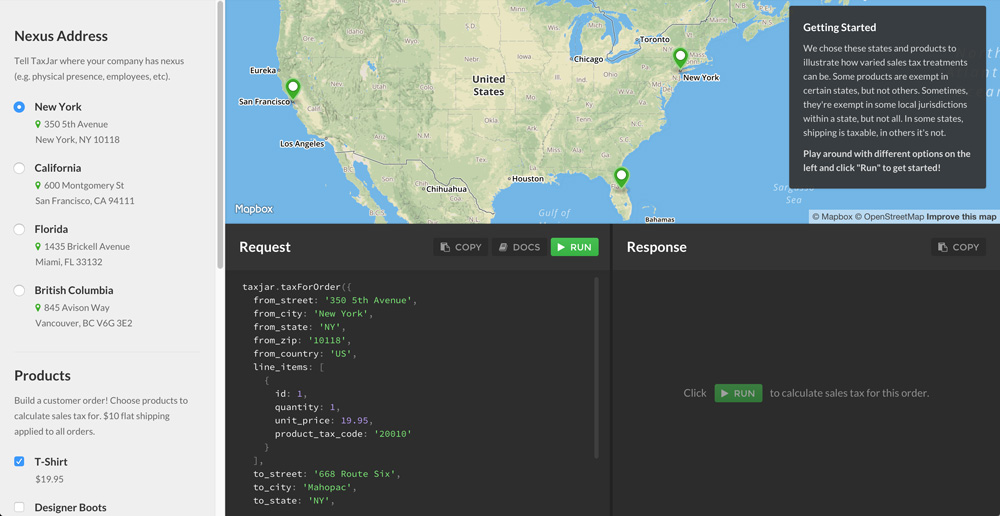
Recently I built TaxJar’s new API demo to demonstrate how we calculate sales tax for orders and the gotchas you may come across in states such as New York with product exemptions. Using the presets panel you can select a nexus address, product, and destination address to generate an editable API call on the fly. Upon clicking the “Run” button, the call is parsed into a JSON object to make a request to our sales tax API. On top of that, I added a map with tooltips explaining specific sales tax rules based on the location.

Using React, CodeMirror, and Mapbox I created an incredible first impression for developers new to our platform. In this article I’m going to show you how it was built and the tools I used to make it happen. If you’d like to check it out for yourself, it’s completely open source and available on GitHub.
Project Setup
Our developer portal is a static website built with Middleman. Since the demo is just a basic collection of components, I wanted a way to easily include it in our existing repository. Thanks to middleman-react I was able to transform my JSX and prototype the demo right away. Most of the heavy lifting for compiling this project was done with Sprockets and a couple Ruby gems.
Since we were already using Bower, I continued using it for utility libraries such as Lodash. Bower is fine for lighter front-end projects, but you’ll run into limitations when building larger apps with React. You’ll want to leverage NPM for build scripts, testing, and magical things with Webpack such as hot reloading and time travel.
For several CommonJS modules that weren’t available on Bower, I simply included them in a vendor folder and used the sprockets-commonjs gem to make them available to my React components.
Component Structure
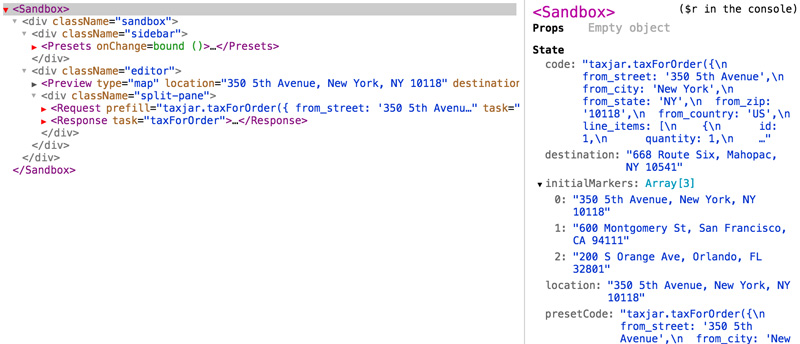
To prototype the demo, I first implemented a container component called <Sandbox>. Here’s a basic overview of the component tree:
```html
```

The sandbox generates code from preset changes and intercepts changes from the request panel to update the map and response. I used an onChange prop for both <Presets> and <Request> that were called once data was ready to be passed back to the sandbox:
javascript
// Request.jsx (Simplified)
var Request = React.createClass({
  updateCode: function(newCode) {
    this.props.onChange({ code: newCode }); // Pass code back to Sandbox
  },
  render: function() {
    return (
      <Editor ref="editor" onChange={this.updateCode} />
    );
  }
});
javascript
// Sandbox.jsx (Simplified)
var Sandbox = React.createClass({
  handleRequest: function(params) {
    // Code now available in sandbox!
    // params.code
  },
  render: function() {
    return (
      <div className="sandbox">
        <Request onChange={this.handleRequest} />
      </div>
    );
  }
});
Data passed back to the sandbox can then flow to other components such as <Preview> and <Response> by again passing data to props.
Passing props is an easy way to communicate between parent and child components. For more complex communication, it’s better to implement a global event system with something like Flux or Redux.
Preset data and tooltip content were stored in a separate file as a JSON object available to the entire application.
Generating & Parsing JavaScript
CodeMirror is an open source text editor used in thousands of sites and apps, including Adobe Brackets and Bitbucket. It’s lightweight and easy to customize. Check out react-codemirror to use it as a component in React. For the API demo, I wanted a quasi-editable text editor that could generate code based on presets but also allow developers to experiment with different values.
Generating the code was straightforward. I used a simple string format utility and JSON.stringify to build a sample API call.
Using Esprima, I was able to parse and tokenize the code to only make the param values editable. CodeMirror’s markText method was used to make the attributes and API method read-only:
javascript
editor.doc.markText(startPos, endPos, {
  atomic: true,
  className: 'locked',
  readOnly: true,
  handleMouseEvents: true
});
The code inside the editor is automatically stored in the component state for retrieval once the “Run” button is clicked. From there, the code is parsed through Rocambole to make an AJAX request to the TaxJar API. Rocambole is used on top of Esprima to recursively walk through Esprima’s AST:
javascript
rocambole.moonwalk(ast, function(node) {
  if (node.type === 'Identifier' && _.includes(allowedMethods, node.name)) {
    method = node.name;
  }
  if (node.type === 'Literal' && node.parent.startToken.value === 'taxjar') {
    methodArgs.push(node.value);
  }
  if (node.type === 'ObjectExpression' && node.parent.type === 'CallExpression') {
    var object = node.toString()
      .replace(/([\$\w]+)\s*:/g, function(_, $1) { return '"'+$1+'":'; })
      .replace(/'([^']+)'/g, function(_, $1) { return '"' + $1 + '"'; });
    methodParams = JSON.parse(object);
  }
});
Using Rocambole’s moonwalk method I can traverse the JavaScript code and pull out the method name, arguments, and parameters. I’m using JavaScript to parse JavaScript and make AJAX calls. Awesome!
From there, I just had to make an AJAX request to our sales tax API using a lightweight wrapper such as reqwest.
Displaying the Response
On a successful AJAX call, the response is displayed in a separate, read-only CodeMirror instance. For the map I extended MapboxMap to render markers and tooltips. Mapbox’s geocoder was used to determine the marker coordinates.

Depending on the locations provided in the API call, the demo will show contextual sales tax info. Currently we explain how sales tax is calculated in our preset states: New York, California, and Florida. These are all pulled from the presets data file.
Copy buttons are available for both the response and request using clipboard.js, a wonderful little library for copying text to the clipboard without Flash.
Wrapping Up
Building the API Demo with React was an absolute blast. I hope you learned something new and discovered a couple tools for your next project. Have any questions or feedback? Leave them in the comments or contact us!

